The gPodder User Manual
In general, the assumption is that you are running the latest version of gPodder 3. Things written here might not exist or work as described in older versions of gPodder. When information applies to older versions of gPodder, this will (should) be explicitly stated.
- Installation
- Configuration
- Everyday usage
- Advanced topics
Installation
If you want to try the latest version, see the instructions at: Run from Git
In general, if you get gPodder via Git or the source tarball, simply run it directly from the source checkout and don’t try to install it system-wide (use your distro’s packages for system-wide installation).
gPodder is designed to also run directly from a source checkout (the maintainer uses it like that all the time):
- Use bin/gpodder to run the GUI
- Use bin/gpo to run the CLI
Configuration
gPodder has numerous configuration options to set its behaviour: how it plays podcasts, handles downloads, and many others.
To change gPodder’s configuration, open the Preferences dialog box by choosing Podcasts > Preferences from the menu bar, clicking the Preferences button on the toolbar, or typing Ctrl-P. Then click the tab containing the options you want to change.
General Preferences
Click the General tab to see gPodder’s general configuration options.
Audio player: Use this drop-down list of compatible audio players installed on your system to choose the one gPodder uses to play audio podcasts. Currently pre-populated application lists are only supported in Linux. (OS X and Windows users, keep reading!)
You can also click the Edit button next to the list to enter a custom audio player command. For example, you might want to run the player with some additional options, or choose a different player that does not appear on the list.
Video player: Use this drop-down list to choose the video player gPodder uses to play video podcasts. This option works the same as the Audio player option, except that it shows media players capable of playing video files.
gpodder.net Preferences
gPodder.net is a Web service that helps you synchronize your podcast subscriptions across multiple devices, discover interesting new podcasts and recommend your podcasts to others. Click the gpodder.net tab to set how gPodder interacts with gPodder.net.
Note: To use gPodder.net, you need to register for a user account first.
Synchronize subscriptions and episode actions: Check this box to merge the subscriptions on your computer or device with your subscription list on gPodder.net. These podcast subscriptions are now available to any other devices you sync with gPodder.net.
Username: Enter your gPodder.net username.
Password: Enter your gPodder.net password.
Device name: Enter a meaningful name for your computer, or keep the one gPodder.net assigns. Make sure the name is unique.
Replace list on server with local subscriptions: Click this button to replace the subscription list on gPodder.net with the list on your device.
Caution: Any podcast subscriptions on gPodder.net but not on your local computer will be lost.
Updating Preferences
Click the Updating tab to see gPodder’s options for updating feeds and downloading new episodes.
Update interval: Drag this slider to choose the frequency that gPodder checks your feeds for new podcast episodes. This time period can be between 10 minutes and 12 hours. If you drag the slider all the way to the left, gPodder will not check for new podcasts automatically, and you will have to update them yourself.
Maximum number of episodes per podcast: Use this spin box to set the maximum number of episodes that gPodder keeps in each podcast feed. Once this maximum is reached, gPodder deletes the oldest episodes in the feed as new ones are added.
When new episodes are found: Use this drop-down list to choose what you want gPodder to do when it finds new podcast episodes on a feed. The available options are:
- Do nothing - gPodder marks new episodes in the feeds as new, but takes no other action.
- Show episode list - gPodder displays a window showing a list of all new episodes available for download. You can then choose the specific episodes that you want to download, ignore, or mark as old.
- Add to download list - gPodder automatically adds all new episodes to the the download list under the Downloads tab in the main window. However, they are marked as paused, and you need to right-click on them and choose Download to get them.
- Download immediately - gPodder adds new episodes to the download queue and automatically downloads them.
Clean-up Preferences
Click the Clean-up tab to see gPodder’s options for managing old downloaded podcasts.
Delete played episodes: Drag this slider to set the length of time before gPodder automatically deletes old podcasts. This time period can be between one and 30 days. If you drag the slider all the way to the left, podcast episodes will not be deleted automatically, and you will have to manage them yourself.
Remove played episodes even if unfinished: By default, gPodder automatically deletes old played but unfinished episodes. Clear this check box if you would like to keep unfinished episodes until you have played them completely. If you have chosen to delete played episodes manually, this option is not available.
Also remove unplayed episodes: By default, gPodder automatically deletes played episodes but leaves unplayed ones alone. Check this box if you want gPodder to clean up unplayed episodes as well. If you have chosen to delete played episodes manually, this option is not available.
Devices Preferences
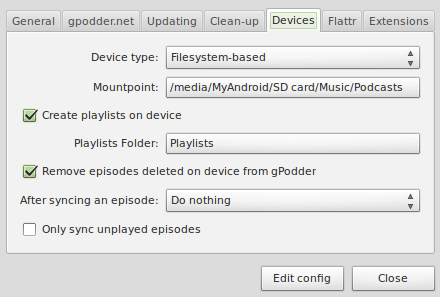
Click the Devices tab to see gPodder’s options for portable media player devices.
Device type: Choose the type of device from this drop-down list that matches your player. The available options are:
- Filesystem-based - Choose this device if your media player is treated like a simple USB storage device, and media files are added by copying them to a directory on the device.
- iPod - Note: Support for syncing to iPods was re-added circa 2022, confirmations of it working or bug reports are appreciated at this time.
Mountpoint: Click this button to choose the desired folder on your device for Podcasts.
Create separate folders for each podcast Enable this to have gPodder create a separate folder on the device for each podcast. If disabled, all podcasts will be put in the same folder.
Create Playlists on device: Enable this option to have gPodder create a m3u format playlist on your device during the sychronisation process. This is only supported for filesystem-based media players. If ‘Create Playlists on device’ is enabled, the following settings can also be configured:
- Use absolute paths in playlists - Enable this to have gPodder use absolute paths in the playlists it creates. If disabled, relative paths will be created.
- Playlists Folder - Click this button to choose the folder on your media player in which your playlist files will be created.
Episode filename method: Select which method will be used to generate filenames for each episode on the device. The available options are:
- Same filename as local
- Use episode title as filename
- Use custom filename format
Custom filename format: Use this field to define a custom filename format which will be used if Episode filename method is set to Use custom filename format.
Maximum filename length: Set the maximum number of characters allowed in a filename on the device. Most devices have a limit to the total number of characters allowed in a file path.
Only sync unplayed episodes: Check this box if you want gPodder to ignore episodes that have already been played when synchronizing podcasts to your device.
Sync existing episodes on device when file size differs from gPodder Check this box to sync episodes again when gPodder detects that their size is different on the device.
Delete episodes from gPodder when deleted on Device When episodes are deleted on device, delete them from gPodder the next time the device is synced. Note that in order to detect when episodes are deleted, Create playlists on device must be enabled.
Delete episodes from Device when deleted in gPodder When episodes are deleted from gPodder, delete them from the Device the next time the device is synced.
After syncing an episode: Choose what you want gPodder to do after it transfers a podcast eposide to your player. The available options are:
- Do nothing - gPodder simply transfers the file and takes no further action.
- Mark as played - gPodder transfers the file and marks it as already played.
- Delete it from gPodder - gPodder transfers the file, then deletes it from the computer.
gPodder Extensions
gPodder comes with a handful of extensions. Check them out or learn how to make one yourself on this page.
Custom PATH
Some extensions require external programs to work properly. gPodder searches all directories in the PATH environment variable to find programs. You may have installed a program in a custom location or are using the Mac build which ignores PATH and uses its own set of directories. In that case you can open Preferences, click the Edit config button, and add the custom directory to the path.alternate setting. Multiple directories can be separated by a ; on Windows and : on Mac and Linux.
Do not include the program name or trailing slash in the directory. Set path.alternate to /opt/homebrew/bin if on Mac and which ffmpeg displays /opt/homebrew/bin/ffmpeg. Set path.alternate to C:\ffmpeg if on Windows and where ffmpeg displays C:\ffmpeg\ffmpeg.exe.
FFmpeg
Several extensions require FFmpeg, such as audio converter, concatenate videos, rockbox convert2mp4, video converter and youtube-dl. Linux users can install it via their distro, while others can visit https://ffmpeg.org/download.html or https://github.com/yt-dlp/FFmpeg-Builds/releases. Mac users with homebrew can run brew install ffmpeg. See Custom PATH if on a Mac or if FFmpeg was installed to a custom location and is not in PATH.
Advanced configuration options
gPodder has many configuration options that are not all directly accessible through the Preferences dialogue box. Click the Edit config button to access the gPodder Configuration Editor, where you can see and change the full list of configuration options. For an up-to-date list, possible values and the defaults, please see src/gpodder/config.py.
Everyday usage
Adding a Podcast
Manually add one at a time using Menu - Subscriptions -> Subscribe to new podcast and paste in the URL of the RSS feed.
Shortcuts for URLs
gPodder tries to be smart about what you enter in the URL field when adding podcasts to save you some typing:
- You can leave out the leading
http://, as gPodder will automatically add it if the URL does not contain a URL scheme.
- If the website has a correct
<link>tag to the podcast RSS feed, gPodder can (most of the time) autodiscover the feed. So, instead of entering “feeds.feedburner.com/uncontrolledairspace”, you can enter “www.uncontrolledairspace.com”, and gPodder will figure out the feed URL (but see the next hint for another nice shortcut for FeedBurner URLs)
- gPodder supports the “fb:” prefix for FeedBurner URLs, so that instead of having to type “feeds2.feedburner.com/podcastname”, you can type “fb:podcastname”, and gPodder will be smart enough to expand the URL correctly.
- Another prefix that works is “yt:” for YouTube users. Use yt:username to add videos from YouTube user “username” to gPodder. Please note that you need a google account to subscribe YouTube user channels: you can find the instructions here.
- For Soundcloud feeds, you can use the “sc:” prefix to add SoundCloud users. Use sc:crunchtime to add music published by user “crunchtime” on Soundcloud.
- If you know about other services where this makes sense, please get in touch, and we can add even more prefixes.
Backing up the subscription list
The Podcasts menu provides an easy way to save your subscription list to an OPML file. The OPML file contains URLs for all the feeds you are subscribed to. It does not contain the status of episodes. You can re-import OPML files using the Podcasts menu. The OPML file format is a simple XML format that can be used to move feed subscriptions between different RSS-aware applications.
You can also backup the files Database (an SQLite 3 database containing subscription and episode information) and Settings.json (a JSON file containing your settings) in $GPODDER_HOME (defaults to ~/gPodder/).
Importing subscriptions from iTunes
Export your iTunes podcast subscriptions to an OPML file. Copy it over to your device or computer and load it into gPodder with the Import from OPML file menu item. To export your iTunes podcast subscriptions to an OPML file right click on “podcasts” in your source menu on the right hand side. Select “export” and save as an OPML file. See http://www.apple.com/itunes/podcasts/.
Importing subscriptions from an OPML file
Older versions of gpodder have an Import from OPML file menu item while newer versions may not. If you have the import option, you can select it, browse to your opml file and import it.
- Launch gpodder
- Select Choose from a list of example podcasts on the gpodder startup assistant
- Change the OPML/Search field to the file url for your opml file (e.g., <file:///home/username/my.opml>’’’)
- You can open the opml file with your browser’s “open file” to obtain the <file://> url if you are unsure of it.
- Select All podcasts and Add
At this point you should have a local list of subscriptions. You can push these up to gpodder.net via the Replace list on server with local subscriptions button on the Preferences : gpodder.net tab.
Listening to downloaded episodes
Most of the audio player applications available for the N8x0 do not support bookmarking (so you can resume playing a podcast from a saved point). Panucci is a resuming audiobook and podcast player written by the gPodder people that is available from Maemo Extras. Install the package and set the player variable to panucci (don’t forget to set maemo_allow_custom_player, as stated above).
Appending episodes to the current playlist
Most applications will stop the current song/episode and start playing the selected episodes when clicking on Play. You can avoid that by setting a custom command in the settings dialog:
Application |
Command |
Remarks |
|---|---|---|
Aqualung |
|
This option loads the files, but does not start playback automatically, you can try adding the -L command for that, but that tends to start playback on the last one loaded. But once the first file is playing, you can load up your play-list from gPodder for hours of listening enjoyment. |
VLC 0.9.4 |
|
This will queue up the file and play the first one and you can add more while you're listening. You may have to click your play button, but once playing it ought to continue to play the created playlist. |
SMPlayer |
|
Adds the files to the current SMPlayer playlist |
Synchronising podcasts to MP3 players
Synchronising podcasts to MP3 Players is supported for any media player that can be mounted via gvfs. You can see the list of available mount backends here. This includes mtp devices on Linux. On Windows currently only devices that can be assigned a drive letter can be accessed. There is also support for iPod synchronization.
Before you can synchronise podcasts to your media player, you should ensure that the player has been set up properly in the ‘Device’ tab. See above for details.
To initiate a sync, select ‘Sync to Device’ from the ‘Extras’ menu:
Previous versions of gPodder required you to sync episodes individually - now all episodes are synced at once.
If you have the ‘Create Playlists on device’ option enabled, the m3u playlists will be written to your device and then the episodes will be copied over. You see the current status of the sync from the ‘Progress’ tab of the main gPodder window. From here, you can also control the number of episodes written to your device concurrently via the ‘Limit downlads’ setting, which also applies to device synchronisation. However, the ‘Limit Rate’ setting in the ‘Progress’ tab has no effect on synchronisation speed.
Playlists
If the ‘Create playlists on device’ option is enabled, gPodder will create playlists on your filesystem-based media player during each sync. One playlist is created per channel. The playlist is created in date order, so that the playlist will always start at the oldest episode and end at the newest. As new episodes are synced to the player, they are automatically added to the playlist. If you delete an episode from within gPodder, it is removed from the playlist.
Removing episodes via synchronisation
If you have the ‘Create playlists on device’ option enabled, you can also enable the option ‘Delete episodes from gPodder when deleted on Device’.
When this feature is enabled, users can delete episodes from gPodder by deleting them from their media player and then performing a sync with gPodder. gPodder uses the m3u playlist to track what episodes were synchronised to the device.
With this feature enabled, if you deleted episodes from your device and then synchronise again, gPodder will present you with a list of deleted episodes. You can choose which of these episodes you wish to delete - all, none or some. See the example below:
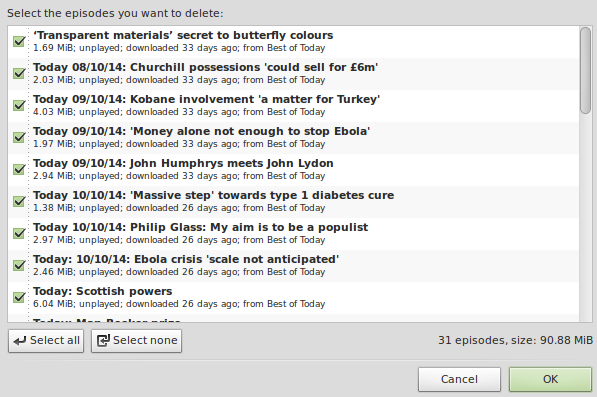
Any episodes that you choose not to delete will not be deleted on from gPodder, but will not be restored to your player. In order to sync them back to your player, you will then need to disable this feature from Devices Preferences and those episodes will be copied back at the next synch.
If ‘Remove episodes deleted on device from gPodder’ is not enabled, any episodes deleted from the device will be copied back over during the next sync. You will instead have to manually delete episodes from within gPodder itself.
Removing episodes when deleted from gPodder
If your media player does not support playlists or deleting tracks then you can choose to delete tracks that have been removed from gPodder from the player when a synchronization is performed. To enable this check the Delete episodes from Device when deleted in gPodder checkbox in the Device Preferences dialog.
Custom file names
You can use custom file names when synchronising. This makes browsing files on your device much more convenient.
The default value for the custom filename field is {episode.sortdate}_{episode.title}.
Some of the available tags are:
{episode.basename}{episode.title}{episode.sortdate}{episode.published}{podcast.title}{podcast.id}
{episode.basename} is the episode’s filename in gPodder’s download folder.
Note that tags for both the episode and the podcast channel are available. The above is by no means an exhaustive list of the tags available, but represents some of the more useful ones.
Multiple fields can be concatenated, e.g.: {episode.sortdate}_{episode.basename} which will result in files of the form 2012-01-14_podcast.mp3.
Occasionally you may find a podcast where the producers don’t provide unique information in the tags, which can result in multiple episodes being given the same name (e.g. podcast.mp3), and thus overwriting one another on synchronisation. In this case the tags {episode.sortdate} and {episode.published} can be useful to create unique filenames.
Both playlist creation and the ability to remove episodes from gPodder by deleting them from the device will work with custom file names enabled.
Keeping downloaded episodes (Archiving)
If you wish to keep an episode around you may archive it by right-clicking on the episode and selecting “Archive”. The episode must be downloaded for the “Archive” option to show.
Once an episode has been archived, gPodder will do its best to never delete it:
- If auto-cleaning is enabled, archived episdoes will not be cleaned.
- When selecting multiple episodes, deleting the selected episodes will (should) keep any archived ones.
Searching in your podcasts or episodes
There are two ways to initiate a search: focus the Podcasts (resp. Episodes) list and start typing or activate the Podcasts (resp. Episodes) > Find Podcast menu item.
You can then enter parts of the title or description to search for.
Episodes can also be queried in more advanced syntax:
Use regular expressions by surrounding your query with slashes:
/[áéíñóúüÁÉÍÑÓÚÜ]/
for title or description containing Spanish letters
Arbitrary complex python expressions (surround them with parenthesis) can also be used,
following the Adjectives (downloaded) and Nouns ('hello' in description) vocabulary
defined in query.py.
Here are a few examples:
(finished and not deleted)
for episodes you fully listened to but didn’t remove (yet?)(downloaded and not played and age > 7)
for episodes published more than one week ago that you downloaded and didn’t play yet(downloaded and s('winter', title))
for downloaded episodes containing winter in their title (case-insensitive).(min > 60)
for more than one hour long episodes(rem < min and rem > .95 * min)
for episodes you just started listening to (more than 95% remains to be played).(section == 'Audio')
to only show the Video section
Advanced topics
Command-line interface
gPodder includes a command-line interface. The command is called gpo. You can get a list of possible actions by running the command without any parameters.
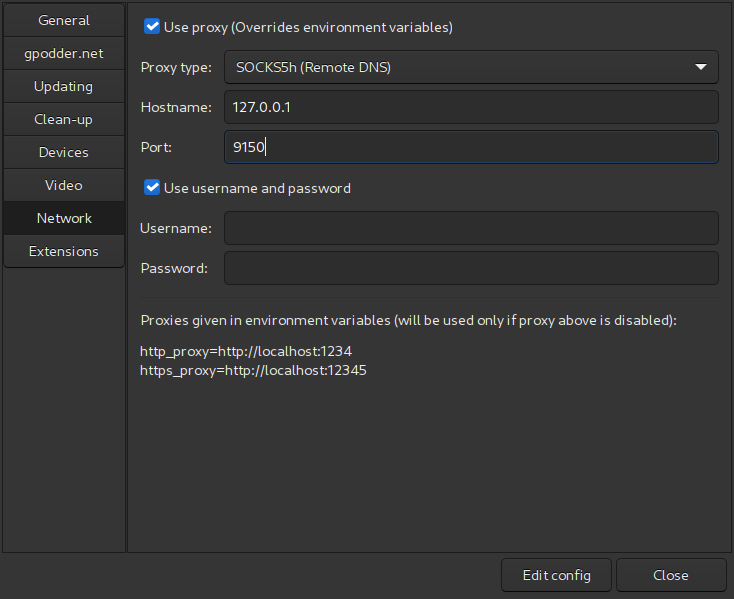
Using a HTTP or SOCKS proxy server
You can use a HTTP proxy server for downloading episodes and feeds. Newer versions of gPodder provide a way to do so in the GUI:
If the proxy option in the GUI is disabled, gPodder will respect the environment variable http_proxy. How to set the http_proxy environment variable in different operating systems is described here:
You can use a SOCKS proxy server by setting the enronment variable all_proxy. If you want the DNS to be resolved through the proxy, use socks5h:// instead. See urllib3 docs for more details.
export all_proxy=socks5://hostname:port
If you want to use a proxy for gPodder, but don’t want to use a proxy for other applications, you can create a short shell script:
#!/bin/sh
export http_proxy=http://username:password@hostname:port
gpodder
Using pipes.digital to fix feeds
There might be some problems with feeds (see the related bug report) - to fix it, you can try to use Pipes.
- Create a new pipe with the problematic feed as source;
- Connect to
Out; - Use the feed preview of the resulting pipe in gPodder
See this pipe for a not broken feed to get an idea of how it should look like.
This service is not afiliated to gPodder in any way. It requires an email registration and currently free for only 3 pipes per user. Maybe a better or free service exists. If so, please let us know!
Original idea used the now defunct Yahoo! Pipes service.
Reporting download problems
If you have got problems with episode downloads, please follow the instructions on the page about Reporting download bugs.
Time stretching (making playback slower or faster)
Making playback slower or faster is generally called time stretching.
See this page for a way to set it up on gPodder.
gPodder Home Folder and Download location
Default gPodder Home folder
Here are the default gPodder home folder locations:
- Linux/FreeBSD: ~/gPodder
- macOS: ~/Library/Application Support/gPodder (access it using Cmd-Shift-g if the Library folder is hidden in Finder)
- Windows installer: Documents\gPodder
- Windows portable: gpodder-3.x.y\config
Changing the downloads folder location and the gPodder Home folder
To change the download directory or gPodder Home, you can set one (or both) of these two environment variables:
GPODDER_HOME: The settings and database files are always stored in$GPODDER_HOME. Downloads will be saved in the folderDownloadsinside the new Home folder you setGPODDER_DOWNLOAD_DIR: Downloads will be saved directly in the folder you specify (which does not have to be in the gPodder Home folder)
There are various ways of setting these variables, depending on your distro/operating system:
- on Windows 10, see e.g. this superuser question;
- on Linux and macOS, read this Ubuntu documentation or this Arch documentation.
Please note that GPODDER_HOME will not work well on a network share.
See #1670 for example.
You should set GPODDER_DOWNLOAD_DIR to your network location but keep GPODDER_HOME local if possible.
Changing the gPodder Home Folder on Windows
On Windows it’s also possible to set the gPodder Home folder using the registry:
in regedit, add a string value named GPODDER_HOME to the HKEY_CURRENT_USER\Software\gpodder.org\gPodder key, with the absolute path you want.
Session-wide changes on Ubuntu Linux
Since gPodder 3.3.0 you can’t change the environment variables for gPodder Home and for the download directory through Preferences > Edit config (see bug 1718). One thing you can do instead is this:
- Open a terminal
- Type:
gedit~/.pam_environment
A text file will open up (it could well be empty). Add one or two of the following lines (depending on whether you want to change both these variables or just one):
- GPODDER_HOME=[path to directory you want to use] - eg. GPODDER_HOME=/media/BigDisk/Podcasts/
- GPODDER_DOWNLOAD_DIR=[path to directory you want to use]
If you are using Kubuntu, you must do the following :
- Open a terminal
- Type :
kate~/.kde/env/setgpodder.sh
An empty text file will open (you can name it whatever you want instead of setgpodder,it could be gpodderdirs, etc). Add one or two of the following lines (depending on whether you want to change both these variables or just one):
- GPODDER_HOME=[path to directory you want to use] - eg. GPODDER_HOME=/media/BigDisk/Podcasts/
- GPODDER_DOWNLOAD_DIR=[path to directory you want to use]
Read more on persistent environment variables in Ubuntu.
Changing the gPodder Home Folder on macOS
Using symbolic links
This is the permanent way to change gPodder’s home or downloads location:
- run gPodder and quit it; it will create the
~/Library/Application Support/gPodderfolder; - run Applications > Utilities > Terminal
- move the gPodder folder where you want (here I move it to my home directory under a new name):
- create a symbolic link from the default location to the new one:
gPodder will now use ~/gPodderData to store settings and subscriptions.
Using environment variables
If you don’t want to use symbolic links, you have to set environment variables for gPodder to know where to store data.
Setting environment variables in your .profile doesn’t apply to gPodder.app. You have to edit the launcher to set these variables.
- right-click gPodder.app in the Finder and select
Show Package Contents - navigate to Contents > Resources
- right-click launcher.py and select Open With > Text Edit
- modify the block starting with To override gPodder home and/or download directory as explained there
Moving to an older gPodder release
gPodder is very conservative with its on-disk format changes, in order to make it easy to rollback to an older release if something is not to your taste. For instance, there has been no change from December 2016 to July 2022.
Moreover, a backup of the database with the old schema is made on each database schema change.
You can find them in $GPODDER_HOME directory, alongside the Downloads folder.
The current database is named Database. Backups are named Database_upgraded-v<VERSION>_<xxxxxxxxxx>,
where VERSION is the old version and xxxxxxxxxx is the timestamp when the upgrade has been performed
(eg. Database_upgraded-v8_1564240521).
To rollback:
- move the
Databasefile out of the way (rename, move to a different folder, delete); - copy the
Database_upgraded-vVERSION_xxxxxxxxxxof your liking toDatabase. Be sure to take the largest timestamp (ie the newest file) if you have dipped in and out of the new release. - you will lose some changes made after the upgrade (added podcasts), but downloaded episodes should be found again after an update. An update would be needed to add any new episodes back into database before downloaded files would be found. Nevertheless episodes downloaded via youtube-dl will not be found again.